

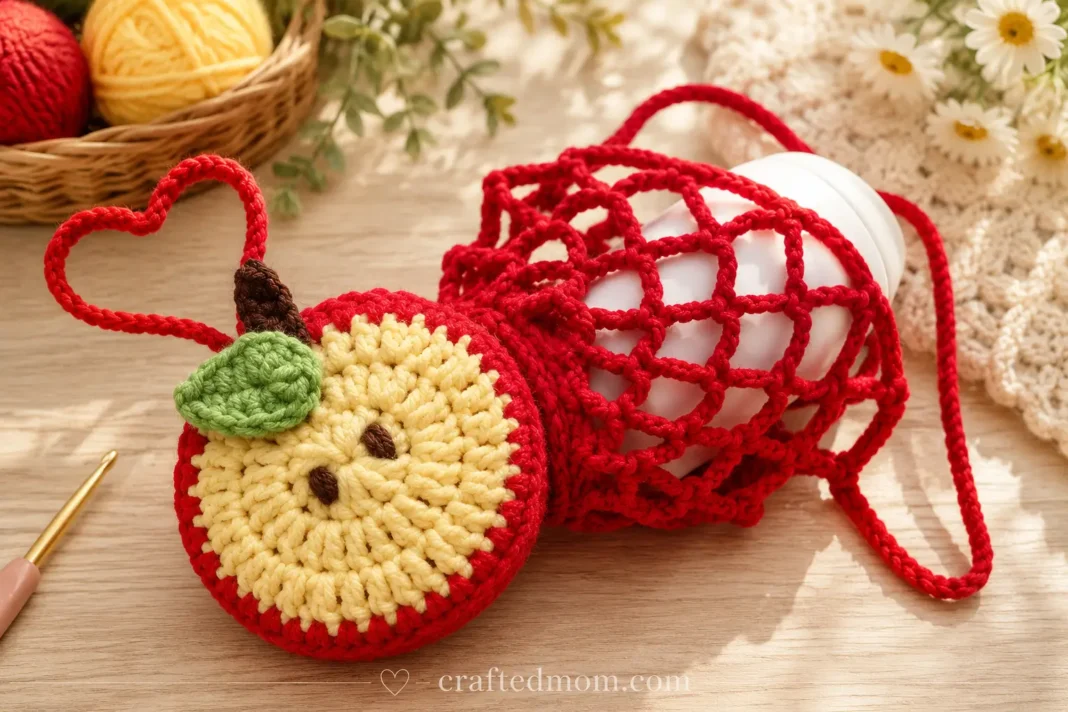
It looks like a little crocheted apple hanging from your bag. Then you open it up, pull out the red mesh hidden inside, and suddenly you have a stretchy holder ready for a water bottle.
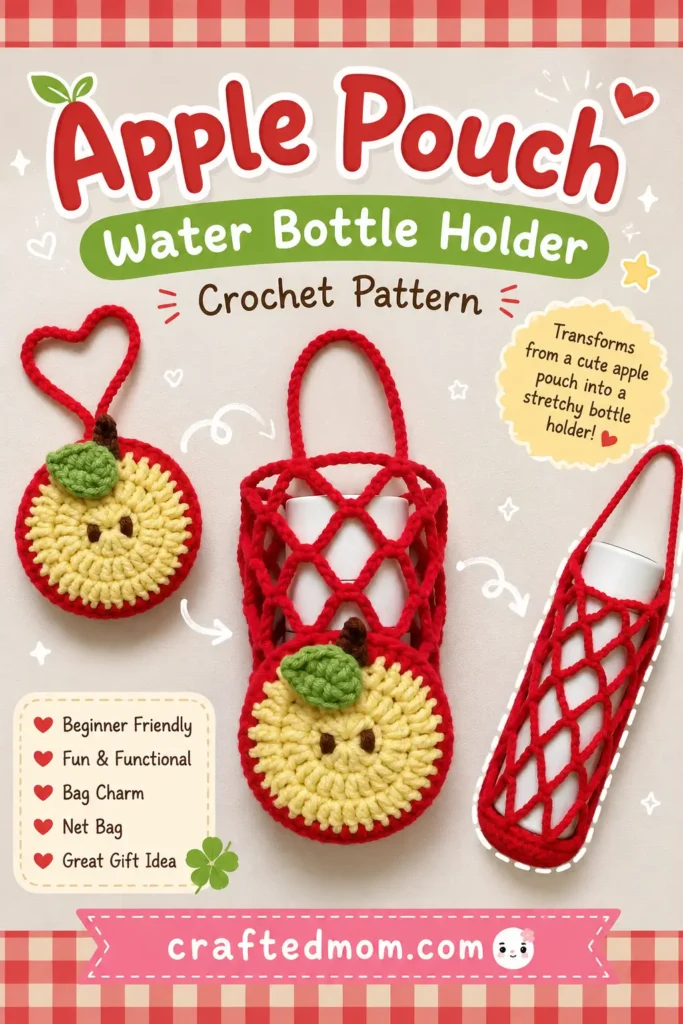
That transformation is what makes this Apple Pouch Water Bottle Holder Crochet Pattern so clever. The round apple isn’t simply decoration. It actually stores the net when you’re not using it, keeping the whole project compact enough to carry as a bag charm. The original tutorial describes the transforming apple pouch as a design that was trending on TikTok.
The construction is also more approachable than the finished project might suggest. You’ll crochet two circular apple pieces, partially join them, build the open mesh directly from one piece, and finish everything with a leaf, stem, embroidered seeds, and straps.
If you’re already comfortable with a magic ring, single crochet, and double crochet, those basic skills cover much of the project.
Apple Pouch Water Bottle Holder Crochet Pattern at a Glance
| Project Detail | Information |
| Project | Apple pouch that opens into a water bottle holder |
| Crochet Hook | 3.5 mm |
| Yarn | 5-ply yarn |
| Main Colors Shown | Yellow, red, green, and brown |
| Starting Method | Magic ring |
| Main Stitches | Chain, slip stitch, single crochet, half double crochet, double crochet |
| Apple Construction | Two circular crochet pieces |
| Net Construction | Open chain-space mesh worked directly from the second apple piece |
| Net Rounds | 8 rounds |
| Decorations | Leaf, stem, and embroidered apple seeds |
| Net Strap | 50 chains or more |
| Bag Charm Strap | 50 chains or more |
| Sewing | Seeds are embroidered; leaf and stem can be sewn or glued |
| Finished Function | Compact apple pouch, water bottle holder, net bag, and bag charm |
The most important construction detail is that the net isn’t a completely separate bag that later gets sewn inside. After the two apple circles are partially joined, the mesh grows directly from the second piece. That keeps the assembly relatively simple.
Materials You’ll Need
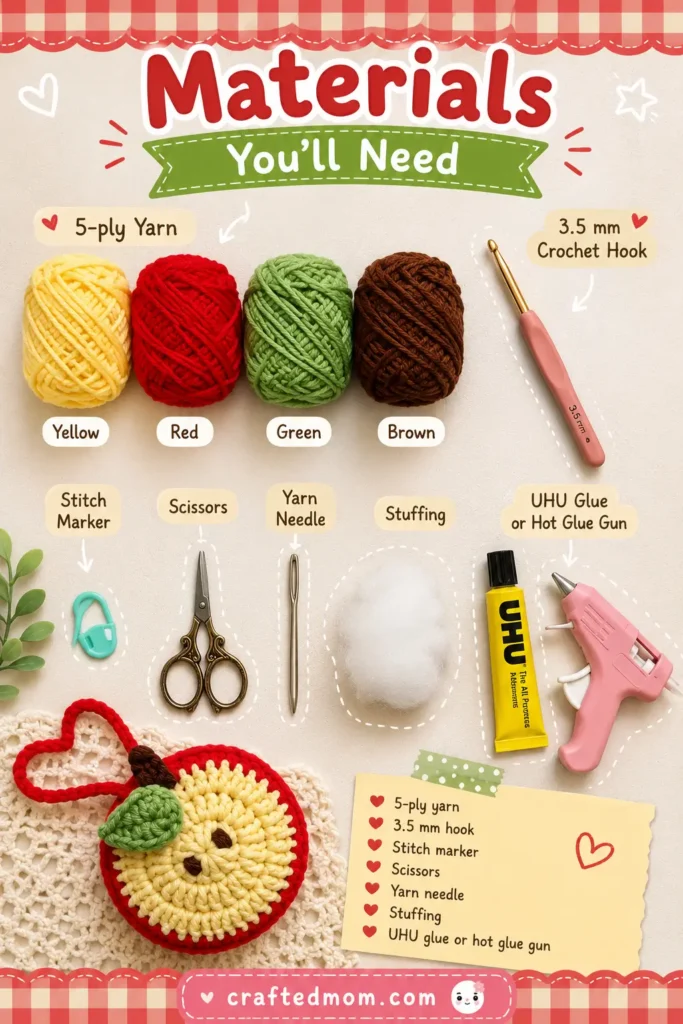
For this project, gather:
- 5-ply yarn
- 3.5 mm crochet hook
- Stitch marker
- Scissors
- Yarn needle
- UHU glue or hot glue gun, if you’re gluing the leaf and stem
The tutorial gives you the choice of sewing or gluing the leaf and stem. If you’re sewing them, leave longer yarn tails when fastening off. If you’re using glue, the tails can be woven in instead.
If you use a hot glue gun, handle it carefully and keep the hot tip and adhesive away from children.
Crochet Abbreviations
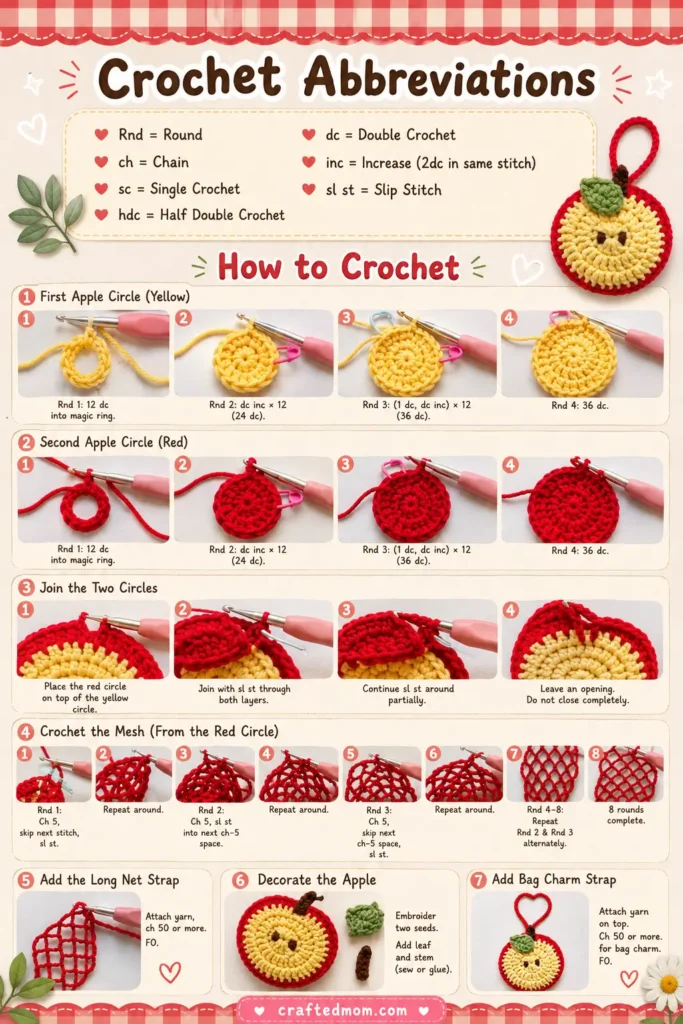
I’m using standard US crochet terminology throughout this pattern.
| Abbreviation | Meaning |
| Rnd | Round |
| ch | Chain |
| sc | Single crochet |
| hdc | Half double crochet |
| dc | Double crochet |
| inc | Increase |
| sl st | Slip stitch |
An increase in this pattern means working two double crochets into the same stitch.
One detail to remember before you begin: the starting ch 2 does not count as a stitch in the apple rounds. The tutorial specifically points this out during Round 1.
How the Apple Pouch Is Constructed
There are several stages to this project:
- Crochet the first apple circle using yellow and red.
- Add a small 7-chain loop to the first piece.
- Crochet a second apple circle in red.
- Partially join the two circles.
- Crochet the expandable mesh directly from the second piece.
- Add the long net strap.
- Crochet the leaf and stem.
- Embroider two apple seeds.
- Add another long strap so the folded apple can hang from a bag.
The two apple pieces use essentially the same four-round circle construction. The important differences are the colors, the small loop, and what happens after Round 4.
How to Crochet the First Apple Piece
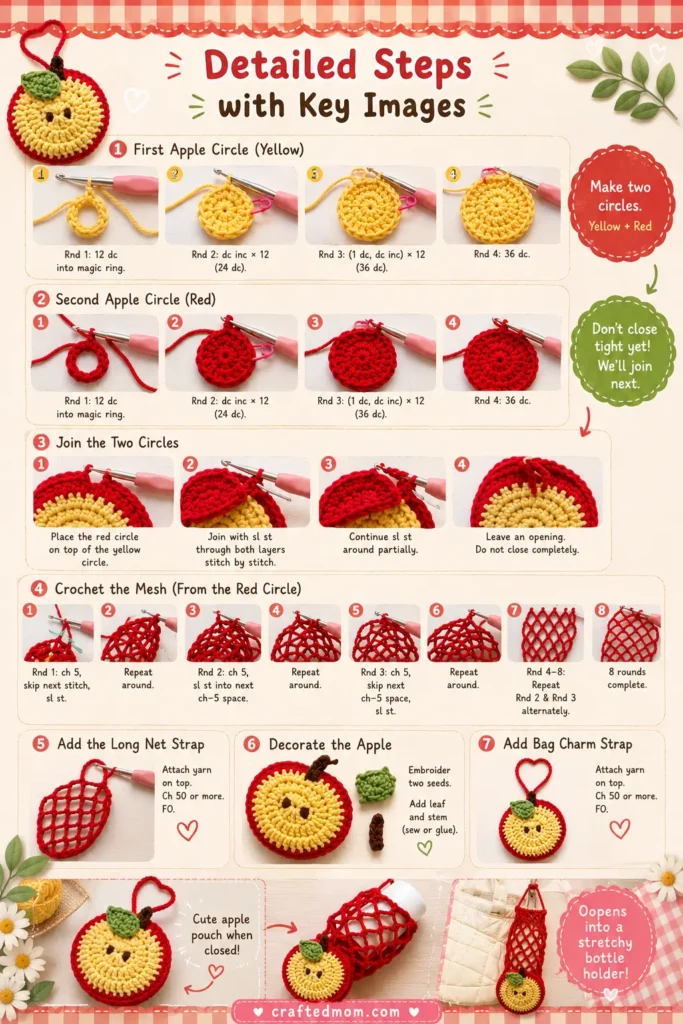
Begin with yellow yarn.
Make a magic ring.
Chain:
ch 2
Place a stitch marker into the second chain. This makes the joining point easier to find when you finish the round.
Round 1
Work:
12 dc into the magic ring
Pull the starting tail to close the center.
Join with:
1 sl st into the second beginning chain
Stitch count: 12 dc
Remember that the initial ch 2 isn’t included in your stitch count.
Round 2
Chain:
ch 2
Move your stitch marker to the second chain.
Now increase in every stitch:
dc inc × 12
In other words, work 2 dc into each stitch around.
Join with a slip stitch into the second beginning chain.
Stitch count: 24 dc
The tutorial notes that you’ll see what appears to be a remaining stitch after reaching 24 double crochets. That stitch is skipped rather than worked into.
Round 3
Chain:
ch 2
Place your stitch marker into the second chain.
Repeat:
(1 dc, dc inc) × 12
This means:
1 dc in the next stitch, 2 dc in the following stitch
Repeat that sequence around.
Stitch count: 36 dc
At the end of this round, we’re also going to change from yellow to red.
Instead of joining with yellow, prepare the red yarn with a slip knot. Insert your hook into the second beginning chain, attach the red loop, and complete the slip stitch using red.
Your working yarn is now red.
Round 4
Using red, chain:
ch 2
Now repeat:
(2 dc, dc inc) × 12
So you’ll work:
1 dc in each of the next 2 stitches, then 2 dc in the third stitch
Repeat around.
You can crochet over the yellow tail as you work the beginning of this round to help secure it.
Once that tail has been worked over, the yellow yarn can be cut.
Stitch count: 48 dc
Join Round 4 with a slip stitch into the second beginning chain.
Add the Small Loop
Don’t fasten off quite yet.
Chain:
ch 7
Then make:
1 sl st into the same place
Finish with:
ch 1
Cut the yarn and weave in the ends.
This little loop becomes important later when the finished apple is used as a bag charm.
Crochet the Second Apple Piece
Now make another circular piece.
Repeat Rounds 1 through 4, but this time work the entire piece in red yarn.
The second piece does not get the small 7-chain loop.
There’s another important difference: after finishing Round 4, do not cut your red yarn. Leave it attached because you’ll use that working yarn to join the two apple pieces and begin the net.
Prepare the Two Apple Pieces for Joining
Take the first piece, the one with the small loop.
Starting from that loop, count to the sixth stitch on each side and place a stitch marker into each sixth stitch.
Now identify the right and wrong sides of your circles.
Stack the pieces with their right sides facing inward. The rounded edges should line up.
You’ll begin joining at the marker positioned on the left side of the small loop.
Join the Apple Pouch
Insert your hook into the second piece and chain:
ch 1
Insert your hook through the corresponding marked stitch on the first piece and make:
1 sc
Continue working single crochets through both layers, joining the two apple pieces together.
I recommend placing your stitch marker into that first single crochet so it’s easy to recognize when you come back around.
Continue until you reach the second stitch marker.
Remove the marker.
Now stop joining the two layers together.
From this point, work single crochets only through the stitches of the bottom red piece, which is the second circle.
Continue around until you return to the beginning.
Join with:
1 sl st into the first sc or beginning chain
This leaves part of the apple open while establishing the edge from which we’ll crochet the hidden mesh.
Crochet the Hidden Net Water Bottle Holder
This is where the little apple starts turning into something much more useful.
The mesh consists mostly of long chain loops anchored with single crochets. When folded, those loops disappear inside the apple pouch. When pulled out, they stretch around a bottle.
Net Round 1
Chain:
ch 12
Skip:
4 stitches
Into the 5th stitch, make:
1 sc
Repeat:
ch 12, skip 4 stitches, 1 sc in the 5th stitch
Continue this pattern around, working your anchoring single crochets only into the second red apple piece.
If you reach the end without enough stitches remaining for another complete repeat, join with a slip stitch into the first chain.
Position Your Hook for Net Round 2
Before beginning the next mesh round, work 5 additional slip stitches along the chains.
Together with the initial joining slip stitch, this creates the 6 slip stitches used to move your hook into position for the next round.
Place your stitch marker into the final slip stitch.
This becomes the new starting point.
Net Round 2
Chain:
ch 12
This time, you don’t skip individual stitches.
Instead, make:
1 sc into the next chain space
Repeat:
ch 12, 1 sc in the next chain space
Continue around.
When you’re ready to begin another round, work 6 slip stitches along the chain to reposition your hook.
Place your stitch marker into the final slip stitch.
Net Rounds 3 to 7
Repeat the same mesh pattern used for Round 2:
ch 12, 1 sc in the next chain space
Continue around each round.
Whenever you reach the beginning and need to move into the next round, work:
6 sl st
Then continue the 12-chain mesh.
Repeat until you’ve completed Round 7.
After Round 7, work another 6 slip stitches to position your hook for the final mesh round.
Net Round 8
This final round uses much shorter chains to bring the top edge together.
Chain:
ch 1
Place your stitch marker into this chain.
Make:
1 sc in the same place
Then repeat:
ch 5, 1 sc in the next chain space
Continue around.
This is an important correction from the original demonstration. The creator initially makes four chains in the video, then specifically corrects the instruction to five chains.
Use 5 chains, not 4.
The creator explains that four chains make the final round too tight, while five give the opening enough room.
Join with:
1 sl st into the first sc or beginning chain
Your expandable net is now finished.
Make the Water Bottle Holder Strap
Now we’ll add the long strap at the top of the mesh.
Chain:
ch 50 or more
The tutorial specifically allows you to add more chains if you want a longer strap.
Fold the bag so you can identify a symmetrical stitch on the opposite side. Place a stitch marker there.
Check that the strap hasn’t twisted.
Attach it to the marked stitch using a single crochet or slip stitch. The tutorial uses a single crochet.
Then:
ch 1
Cut your yarn and weave in the ends.
At this point, the mesh portion is complete and can be tucked entirely inside the apple pouch.
That disappearing-net feature reminds me of the same clever compact-storage idea behind the Magic Pouch Net Bag Crochet Pattern. If you like crochet projects that transform from a small pouch into something practical, that would be a natural project to make next.
Crochet the Apple Leaf
Switch to green yarn.
Make a slip knot.
Chain:
ch 6
Skip the first chain.
Starting in the second chain from your hook, work:
1 sl st
1 sc
1 hdc
1 dc
You should now have one starting-chain stitch remaining.
Into that last chain, work:
5 dc
Those five double crochets curve you around the end of the leaf.
Now continue down the opposite side of the foundation chain.
Work:
1 dc
1 hdc
1 sc
1 sl st
Finish with:
ch 1
Cut your yarn.
If you’re sewing the leaf to the apple, leave a long tail. If you’re using glue, you can cut the tail shorter and weave it in.
Crochet the Apple Stem
Using brown yarn, make a slip knot.
Chain:
ch 5
Skip the first chain.
Starting in the second chain from your hook, work:
1 sc in each remaining chain
Finish with:
ch 1
Cut the yarn.
Again, leave a longer tail if you plan to sew the stem onto the apple. If you’re gluing it, you can weave in the ends instead.
Attach the Leaf and Stem
Position the green leaf and brown stem near the top of the apple.
The tutorial uses glue to secure both pieces and mentions UHU glue, with a hot glue gun given as another option.
Sewing is also possible. If you prefer that method, use the long yarn tails you left when finishing each piece.
I would arrange both pieces first and check how they look before permanently attaching them.
Embroider the Apple Seeds
Use brown yarn for the seeds.
Attach the yarn from the wrong side of the round apple section.
Bring it through to the right side.
The tutorial adds two seeds on the first round, positioning them over two double crochet stitches.
Once both seeds are embroidered, secure the yarn on the wrong side and weave in the ends.
Those two little brown stitches make a surprisingly big difference. With the yellow center, red border, green leaf, and brown stem in place, the folded pouch finally reads clearly as an apple rather than simply a round crochet pouch.
Add the Long Bag Charm Strap
There’s one more strap to make.
This one lets you carry the folded apple as a charm.
Using red yarn, make a slip knot.
Attach the yarn to the second apple piece, choosing a stitch positioned just behind the small loop you made earlier.
Chain:
ch 1
Then make:
ch 50 more
You can add additional chains if you want a longer strap.
Before attaching the other end, make sure the chain hasn’t twisted.
Join it back near the starting point with:
1 sl st
Then:
ch 1
Cut the yarn and weave in the ends.
To use the apple as a bag charm, pull this larger strap through the little 7-chain loop.
How the Finished Apple Pouch Works
Once everything is complete, push the red net into the opening between the two apple circles.
Keep tucking it inside until only the round apple is visible.
Now you’ve got a compact crochet apple with its mesh hidden inside.
When you need the holder, pull the mesh back out, unfold it, and place your bottle inside. The long mesh strap gives you a way to carry it.
That’s the part of this pattern I find especially satisfying. The apple isn’t an extra pouch sewn onto a bottle holder just for decoration. It’s part of the storage system itself.
If this transforming construction is what caught your attention, the Strawberry Pouch Market Bag Crochet Pattern is another fruit-inspired project worth pairing with it. The Pufferfish Drawstring Pouch Crochet Pattern and Whale Drawstring Pouch Crochet Pattern are good choices when you want another small crochet project with a practical pouch function.
For something smaller, the Nemo and Dory Fish Keychain Crochet Pattern takes the crochet accessory idea in a different direction.
Tips for Getting a Neater Finished Apple Pouch
The construction isn’t complicated, but a few details are worth watching closely.
First, don’t count the beginning ch 2 as a stitch when making the apple circles. That affects your stitch totals from the very first round.
Second, pay attention to which side of each apple circle faces inward when you stack them. The tutorial specifically positions the right sides inside before joining the pieces.
Third, don’t skip those six slip stitches when moving between mesh rounds. They’re what reposition your hook so the next round begins from the right part of the chain loop.
And most importantly, remember the creator’s correction for Round 8:
Make 5 chains between the single crochets, not 4.
That small correction prevents the top edge of your net from becoming unnecessarily tight.
Your Little Apple Has a Secret
Fold everything away and you’d never guess how much red mesh is hiding behind that round yellow-and-red apple.
That’s the charm of the Apple Pouch Water Bottle Holder Crochet Pattern. The leaf, stem, seeds, and little hanging loop make it look like a decorative crochet apple, but pulling out the hidden net turns it into something you can actually use.
Keep it attached to a bag, tuck the mesh away when it’s empty, then unfold it whenever you need the bottle holder. It’s a smart little combination of decorative crochet and practical construction, all built from familiar stitches.
More Small Crochet Projects to Make
If the compact size and playful design of this apple caught your eye, you could continue with another small project rather than jumping straight into a large blanket or wearable.
The Frog and Bear Wallet Crochet Pattern keeps the practical theme going, while the Rose Bouquet Coaster Crochet Pattern combines a functional item with a decorative transformation.
For small character projects, try the Mini Miffy Crochet Pattern, Moo Deng Baby Hippo Crochet Pattern, or No Sew Octopus and Jellyfish Crochet Pattern.
And if you enjoy projects with accessories and extra personality, the Dress Up Leggy Frog Bag Friend Crochet Pattern gives you a little frog with removable crochet outfits.
Frequently Asked Questions
What yarn does the Apple Pouch Water Bottle Holder Crochet Pattern use?
The tutorial uses 5-ply yarn. The finished example uses yellow and red for the apple, green for the leaf, and brown for the stem and seeds.
What size crochet hook do I need?
Use a 3.5 mm crochet hook, as specified in the project materials.
How many apple pieces do I crochet?
You make two circular pieces. The first uses yellow for Rounds 1 to 3 and red for Round 4, while the second repeats Rounds 1 to 4 in red.
Can I make the water bottle holder strap longer?
Yes. The pattern begins with 50 chains, but the tutorial explicitly says you can add more chains when you want a longer strap.
