

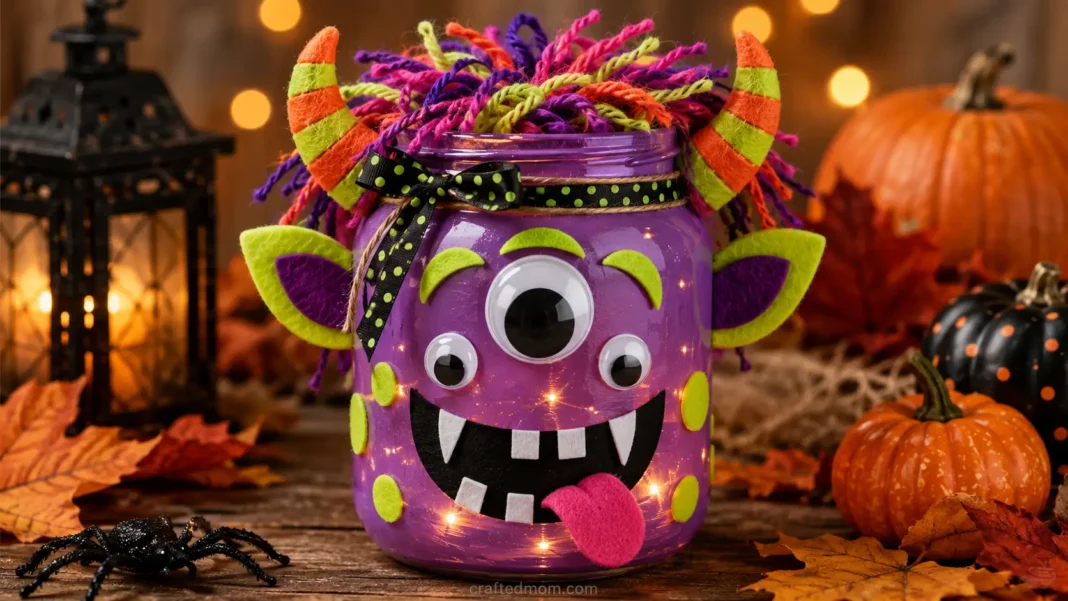
This monster mason jar craft turns a simple glass jar into a colorful Halloween character with bright paint, silly eyes, funny teeth, wild hair, and optional flameless lights. The best part of this project is that there isn’t one monster you’re supposed to copy.
You can choose the color, number of eyes, shape of the mouth, teeth, horns, ears, hair, spots, stripes, and expression. That open-ended design is what separates this craft from more specific Halloween characters such as Frankenstein, vampires, witches, or mummies.
Use the finished monster as shelf décor, a mantel accent, a party centerpiece, a Halloween table decoration, or a flameless monster luminary. Make one goofy jar or create a whole family of monsters that look completely different.
Why You’ll Love This Monster Mason Jar Craft
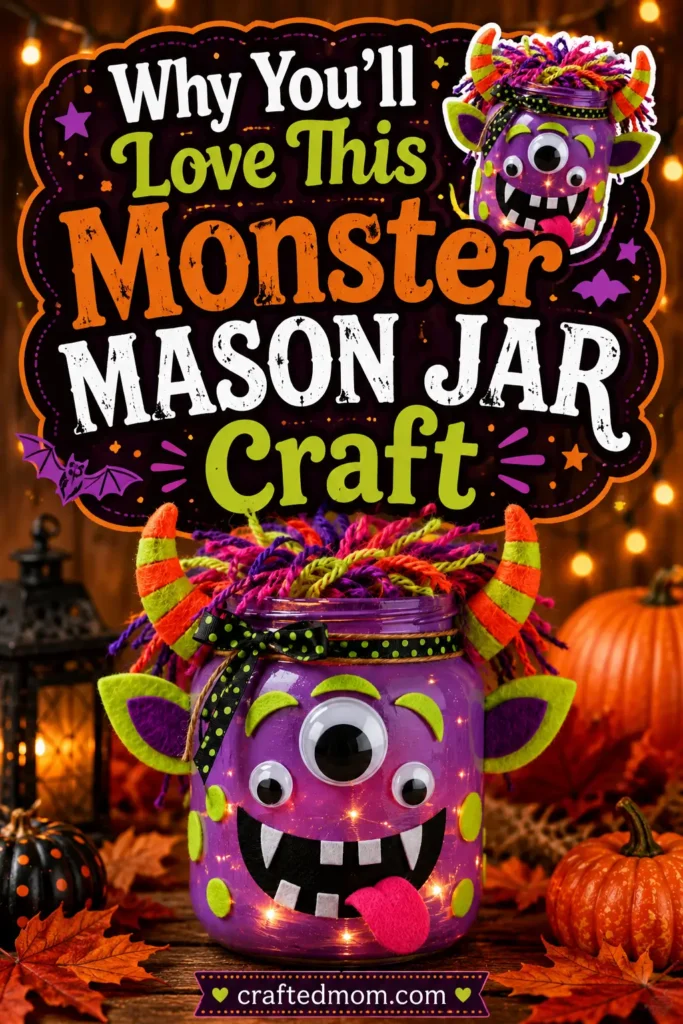
This is one of the easiest Halloween mason jar ideas to personalize because there really is no single correct monster design.
You can start with whatever colors and craft supplies you already have, then build the character around them. One jar could have a single giant eye and two horns, while another has six googly eyes, wild yarn hair, and one crooked tooth.
This project is especially good for:
- Using assorted leftover craft supplies
- Experimenting with bright Halloween colors
- Making cute, silly, or slightly spooky characters
- Creating several jars without repeating the same design
- Letting kids make creative choices with adult supervision
- Building a monster-themed centerpiece
- Adding optional flameless lighting
- Creating a colorful Halloween display
The key idea is simple: your monster does not need to look like anyone else’s.
Supplies You’ll Need
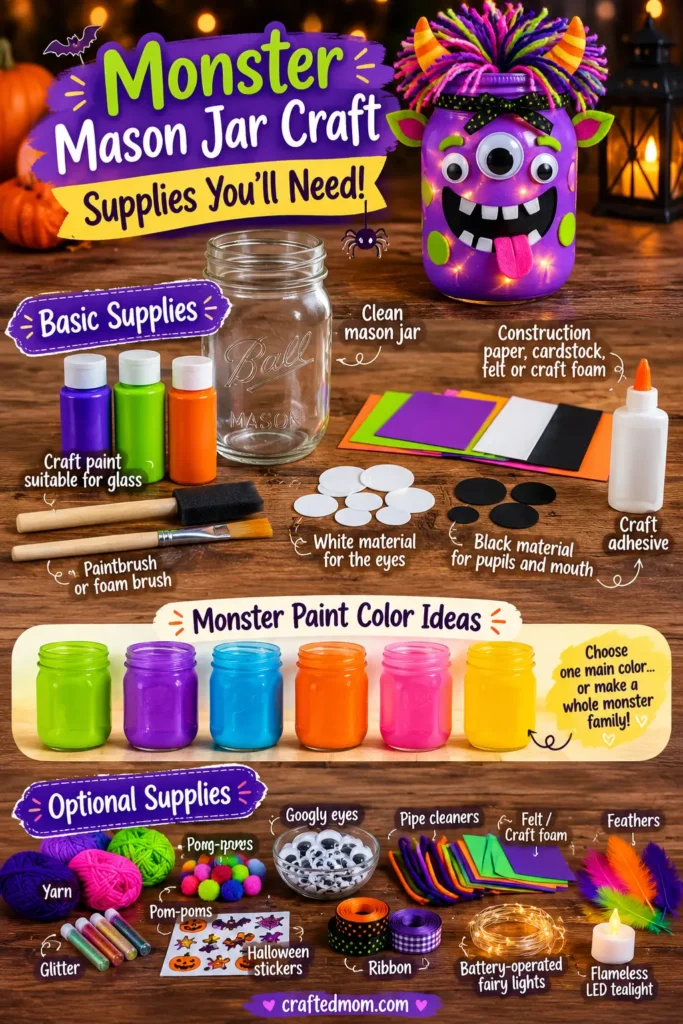
Basic Supplies
- Clean mason jar
- Craft paint suitable for glass
- Paintbrush or foam brush
- White material for the eyes
- Black material for pupils and mouth
- Construction paper, cardstock, felt, or craft foam for facial features
- Craft adhesive appropriate for the materials you’re using
Monster Paint Color Ideas
Choose one main color for the jar:
- Green
- Purple
- Blue
- Orange
- Pink
- Yellow
You can also make several jars in different colors if you’re planning a monster family.
Optional Supplies
- Googly eyes in different sizes
- Pom-poms
- Pipe cleaners
- Yarn
- Feathers
- Craft foam
- Felt
- Halloween stickers
- Glitter
- Ribbon
- Battery-operated fairy lights
- Flameless LED tealight
You don’t need every optional material. Choose the ones that fit the monster you’re designing.
Because the supplied project doesn’t identify a particular tested paint or adhesive, use products suitable for the surfaces and materials involved and follow their preparation, drying, curing, and adhesion directions.
Before You Start: Prepare the Mason Jar
Before decorating, make sure the jar is:
- Empty
- Clean
- Completely dry
- Free from labels
- Free from sticky adhesive residue
- Free from grease and fingerprints
- Free from chips or cracks
Cleaning the outside properly gives you a better surface for the paint.
Because you’re working with glass, inspect the jar carefully before handing it to a child or beginning the project.
How to Make a Monster Mason Jar Craft
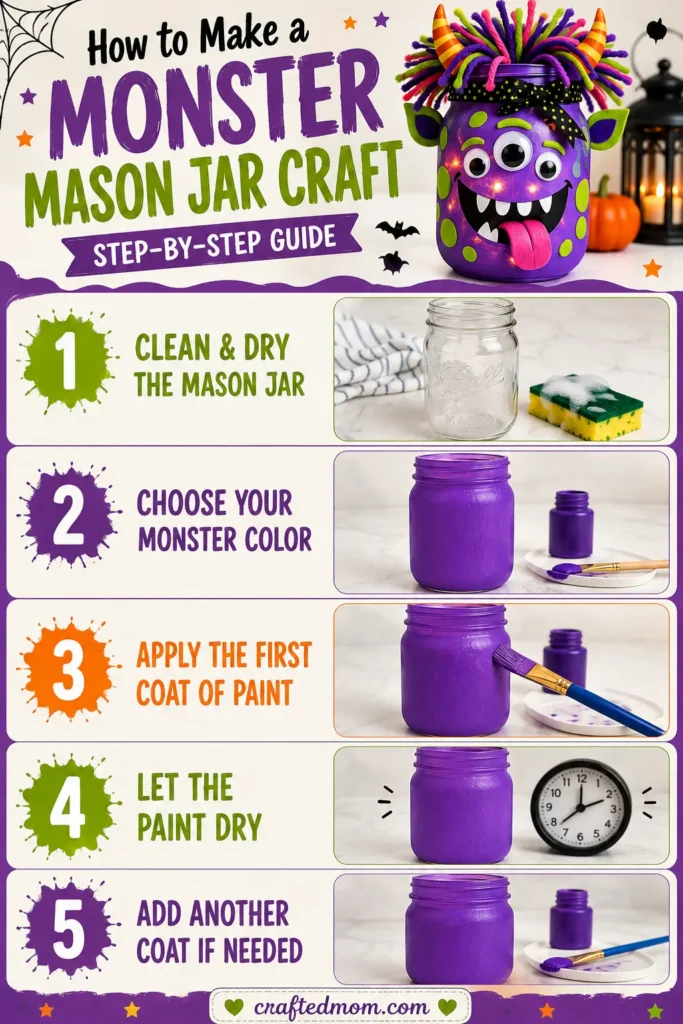
Step 1: Clean and Dry the Mason Jar
Wash the jar thoroughly.
Remove the label and clean away any sticky residue that remains.
Dry the glass completely before adding paint.
Step 2: Choose Your Monster Color
Start the monster’s personality with its base color.
Try:
- Bright green
- Purple
- Blue
- Orange
- Pink
- Yellow
A bright purple monster with green details will feel very different from a blue monster with orange horns, even if you use the same basic jar.
If you’re making several jars, choosing different colors is an easy way to keep the group varied.
Step 3: Apply the First Coat of Paint
Apply a thin layer of craft paint suitable for glass to the outside of the jar.
Work around the surface with relatively even strokes.
Avoid piling on one very heavy layer.
Step 4: Let the Paint Dry
Allow the first coat to dry according to the paint manufacturer’s instructions.
Don’t start attaching eyes, teeth, or other decorations while the surface is still tacky.
Step 5: Add Another Coat if Needed
Once the paint is dry, look at the coverage.
If the finish needs more color, add another thin coat.
Use however many coats the actual paint and design require rather than assuming every jar needs the same number.
Design Your Monster Face
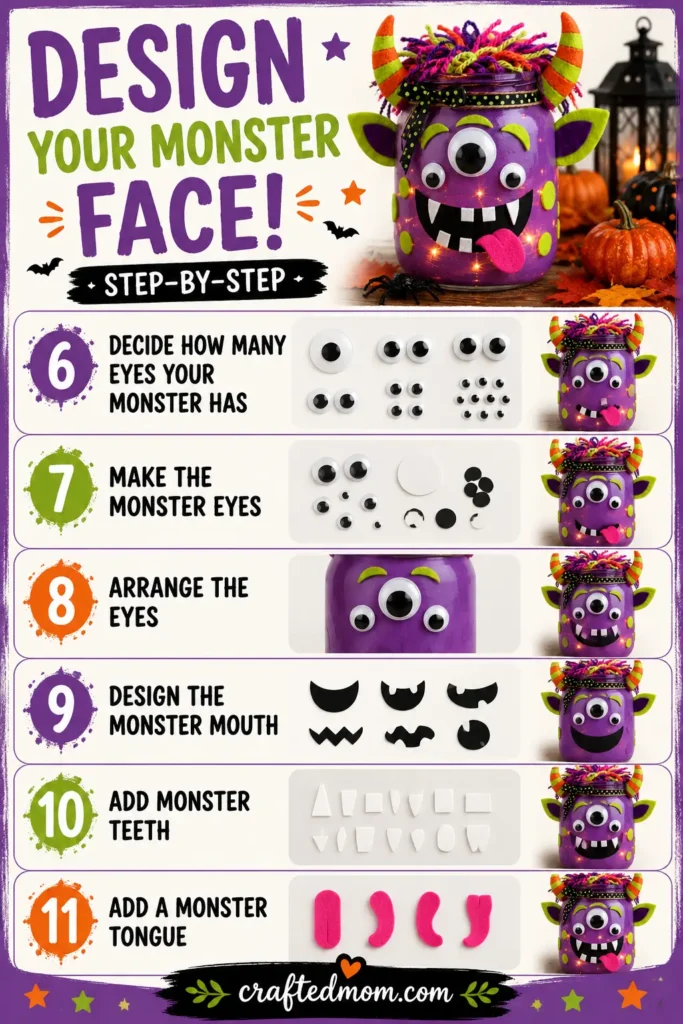
This is the main creative section of the craft.
Instead of trying to copy one specific face, build your monster piece by piece.
Step 6: Decide How Many Eyes Your Monster Has
Your monster can have:
- One giant eye
- Two eyes
- Three eyes
- Four eyes
- Lots of tiny eyes
There is no correct number.
One giant eye creates a bold cyclops-style face, while several little eyes make the monster much sillier.
Step 7: Make the Monster Eyes
Create the eyes from:
- Paper circles
- Cardstock
- Craft foam
- Googly eyes
If you’re using googly eyes, mix different sizes for a more playful look.
For handmade eyes, make the white shapes first, then add black pupils.
Step 8: Arrange the Eyes
Don’t glue the eyes immediately.
Move them around first and experiment with layouts such as:
- One eye directly in the center
- Three eyes in a row
- One eye higher than the other
- Eyes pointing in different directions
- Several eyes scattered across the face
Once you’re happy with the arrangement, attach them securely.
Step 9: Design the Monster Mouth
Create a mouth using black paint or another suitable decorative material.
Try a:
- Huge grin
- Tiny smile
- Crooked mouth
- Open mouth
- Zigzag mouth
- Surprised “O”
Keep enough room around the mouth for teeth or a tongue if you’re adding them.
Step 10: Add Monster Teeth
Make teeth from white:
- Paper
- Cardstock
- Craft foam
- Another suitable material
Possible designs include:
- Two fangs
- One giant tooth
- Lots of small teeth
- Crooked teeth
- A mix of large and small teeth
Don’t worry about making them symmetrical.
Uneven teeth can make the monster look much more playful.
Step 11: Add a Monster Tongue
For a silly variation, add a pink or red tongue.
It can:
- Stick straight out
- Hang toward one side
- Curl slightly
This step is optional, but it works especially well with a crooked or open mouth.
Add Horns, Ears, and Hair
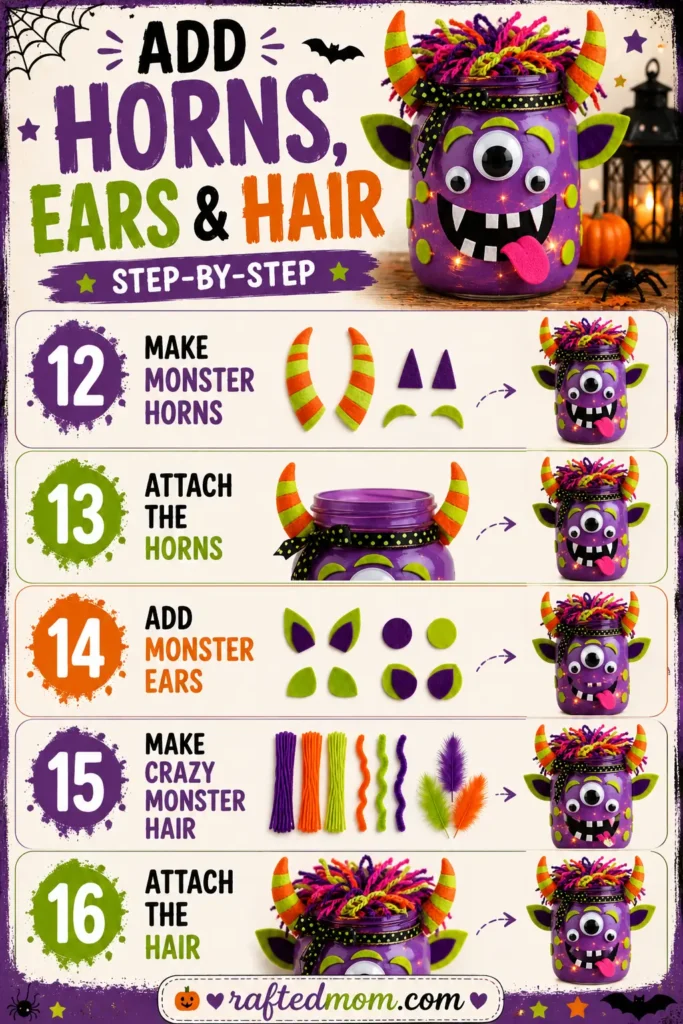
The face establishes the character, but dimensional details can make the monster even more distinctive.
Step 12: Make Monster Horns
Create one, two, or several horns.
Possible shapes include:
- Triangles
- Curved horns
- Short horns
- Mismatched horns
Use cardstock, felt, craft foam, or another suitable lightweight material.
Step 13: Attach the Horns
Position the horns near the jar opening or upper sides.
Before attaching them permanently, look at the jar from the front to make sure the horns remain visible.
Step 14: Add Monster Ears
You can also add ears.
Try:
- Pointed ears
- Round ears
- Oversized ears
- Tiny ears
- Mismatched ears
The two ears don’t have to match.
A round ear on one side and a pointed ear on the other can actually make the monster more interesting.
Step 15: Make Crazy Monster Hair
Use:
- Yarn
- Paper strips
- Pipe cleaners
- Feathers
Your monster’s hair can be:
- Spiky
- Messy
- Curly
- Straight
- Multicolored
Step 16: Attach the Hair
Secure the hair near the top of the jar.
Keep it high enough that it doesn’t cover most of the monster’s eyes.
A little overlap can look fun, but the main facial features should remain readable.
Add Monster Patterns and Accessories
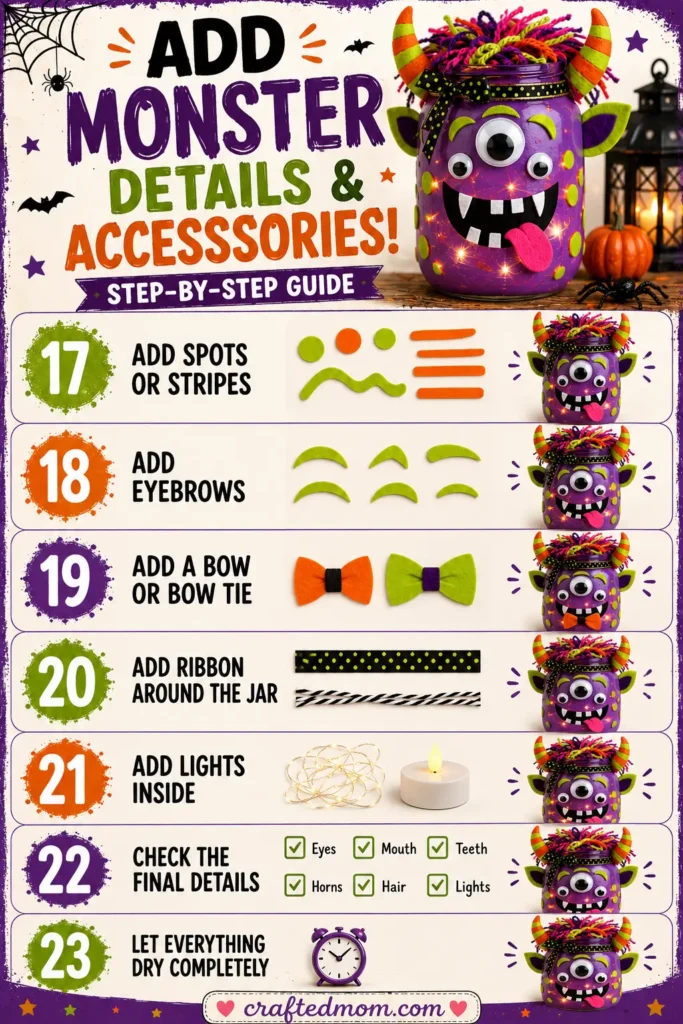
Now you can add the smaller details that give the jar even more personality.
Step 17: Add Spots or Stripes
Decorate the body with:
- Dots
- Stripes
- Zigzags
- Freckles
- Patches
Use a color that contrasts with the main jar color.
A purple monster, for example, could have green spots or orange stripes.
Step 18: Add Eyebrows
Eyebrows aren’t required, but they can completely change the expression.
Try:
- Raised eyebrows
- Crooked eyebrows
- Thick eyebrows
- One eyebrow
Raised brows can make the monster look surprised, while angled brows can create a slightly spookier look.
Step 19: Add a Bow or Bow Tie
A bright bow or bow tie can make a cute monster even more playful.
Halloween-friendly colors include:
- Orange
- Purple
- Black
- Green
Step 20: Add Ribbon Around the Jar
Wrap ribbon or twine around the jar neck if you’d like another decorative detail.
Choose something that coordinates with the rest of the monster rather than adding a completely unrelated color.
Step 21: Add Lights Inside
Once everything is completely dry, you can add:
- Battery-operated fairy lights, or
- A flameless LED tealight
This turns the project into a glowing monster jar.
Keep the battery compartment or switch easy to reach.
Step 22: Check the Final Details
Look at the finished monster from the front and make sure:
- The eyes remain visible.
- The mouth is easy to read.
- The teeth are secure.
- Horns and ears feel stable.
- Hair isn’t covering the face.
- Any lighting controls remain accessible.
Step 23: Let Everything Dry Completely
Let all paint and adhesive dry or cure fully according to the product instructions before displaying the jar.
Easy Monster Mason Jar Craft Tips
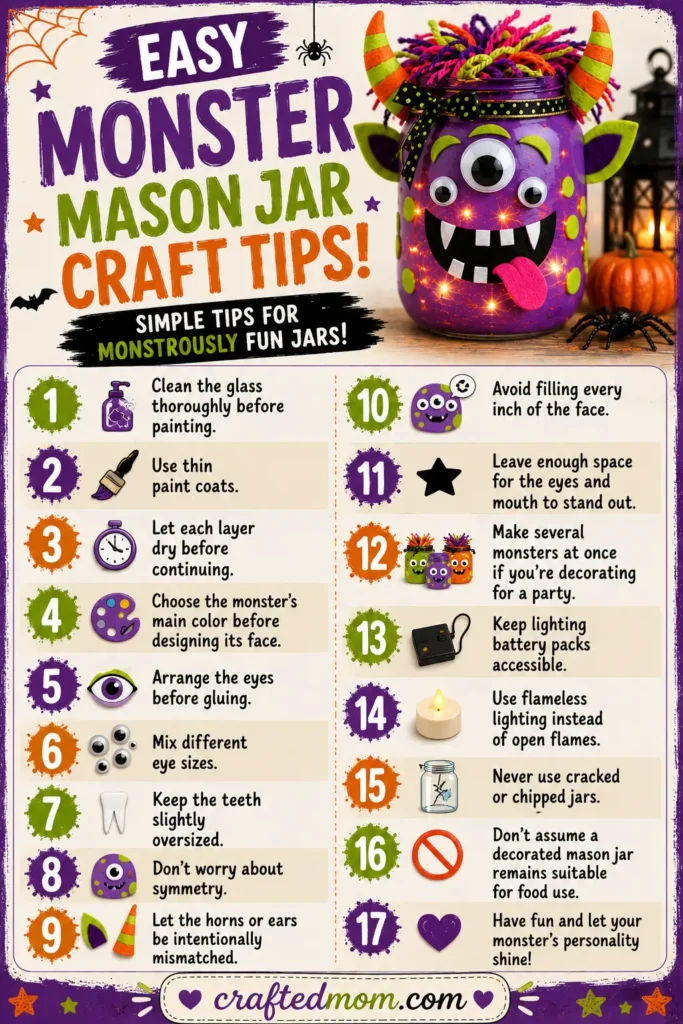
A few small choices can make the finished monster easier to assemble and more visually interesting:
- Clean the glass thoroughly before painting.
- Use thin paint coats.
- Let each layer dry before continuing.
- Choose the monster’s main color before designing its face.
- Arrange the eyes before gluing.
- Mix different eye sizes.
- Keep the teeth slightly oversized.
- Don’t worry about symmetry.
- Let the horns or ears be intentionally mismatched.
- Avoid filling every inch of the face.
- Leave enough space for the eyes and mouth to stand out.
- Make several monsters at once if you’re decorating for a party.
- Keep lighting battery packs accessible.
- Use flameless lighting instead of open flames.
- Never use cracked or chipped jars.
- Don’t assume a decorated mason jar remains suitable for food use.
Monster Mason Jar Face Ideas
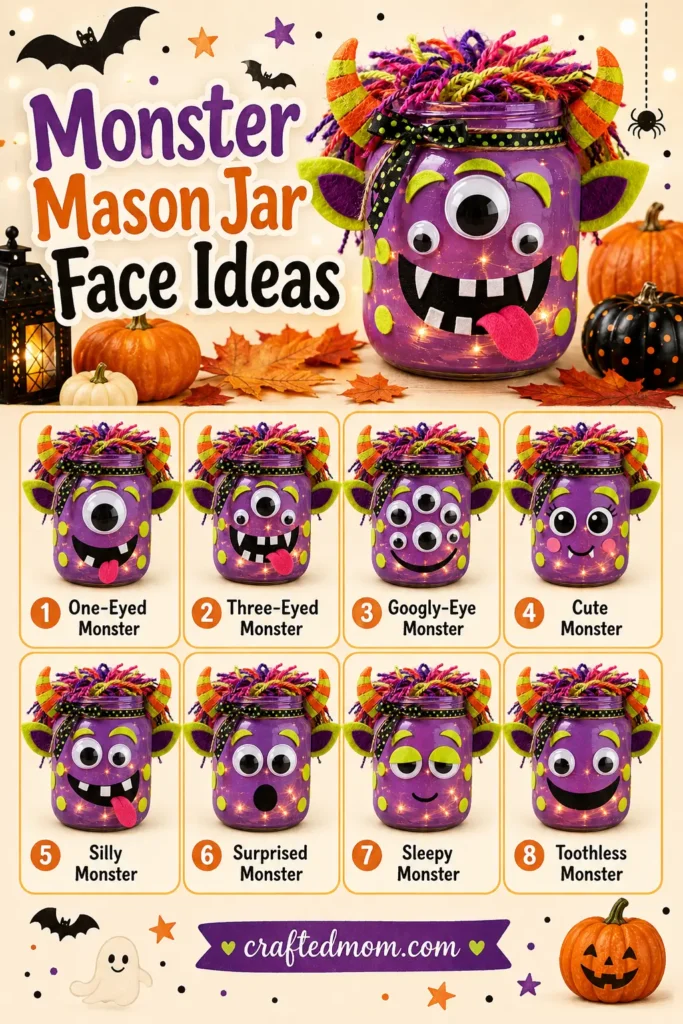
The face is where you can make each jar completely different.
One-Eyed Monster
Place one oversized eye in the center of the jar.
Add a big grin or a couple of crooked teeth underneath.
Three-Eyed Monster
Arrange three eyes across the upper part of the face.
Make them the same size for a cleaner look or mix sizes for something sillier.
Googly-Eye Monster
Use several googly eyes in different sizes.
They can be arranged neatly or scattered randomly.
Cute Monster
Use:
- Big friendly eyes
- Rosy cheeks
- Tiny teeth
- Small smile
Bright colors and a bow can soften the whole design.
Silly Monster
Use:
- Mismatched eyes
- Crooked mouth
- Wild teeth
- Funny tongue
Add uneven horns or messy yarn hair for even more personality.
Surprised Monster
Use large eyes and an open round mouth.
Sleepy Monster
Try half-closed eyes with a tiny relaxed mouth.
Toothless Monster
Skip the teeth completely and give the monster a large friendly grin.
Monster Mason Jar Variations to Try
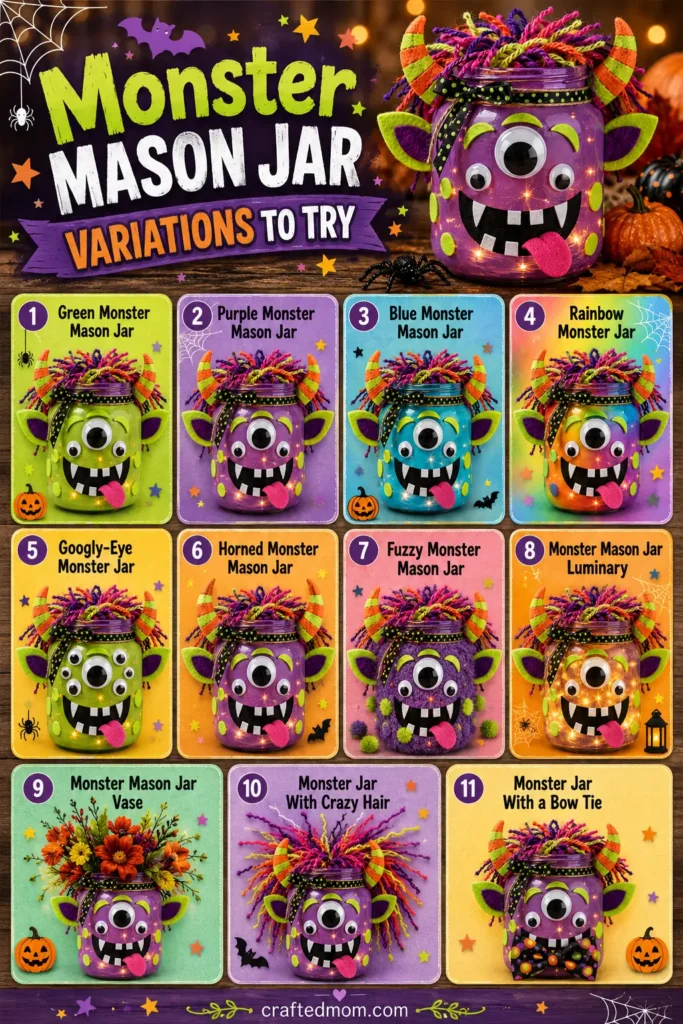
Green Monster Mason Jar
Use green as the main color with purple and black details.
Just avoid automatically adding Frankenstein’s defining stitches, jagged hair, and bolts if you want this to remain a general monster.
Purple Monster Mason Jar
Paint the jar purple, then add orange or green accents.
Blue Monster Mason Jar
Blue gives you a brighter, less traditional Halloween monster.
Rainbow Monster Jar
Mix multicolored features, horns, hair, spots, and accessories.
Googly-Eye Monster Jar
Use several googly eye sizes as the main visual feature.
Horned Monster Mason Jar
Make large horns the most recognizable part of the design.
Fuzzy Monster Mason Jar
Add yarn, pom-poms, or another suitable textured craft material.
Monster Mason Jar Luminary
Put flameless lighting inside once the craft is fully dry.
Monster Mason Jar Vase
Use the finished jar for suitable artificial Halloween or seasonal stems.
Monster Jar With Crazy Hair
Use bright yarn or pipe cleaners to create an exaggerated hairstyle.
Monster Jar With a Bow Tie
Add a colorful Halloween bow tie.
Monster Mason Jar Family
Create several jars with completely different:
- Colors
- Eye counts
- Teeth
- Horns
- Hairstyles
- Expressions
This is one of the best ways to show what makes the monster theme different from more fixed Halloween characters.
Cute vs. Silly vs. Spooky Monster Mason Jar
The same basic jar can go in three very different directions.
| Cute Monster | Silly Monster | Spooky Monster |
| Rounded eyes | Mismatched eyes | Angled eyes |
| Small teeth | One giant tooth | Larger teeth |
| Rosy cheeks | Wild hair | Dramatic horns |
| Bright colors | Tongue sticking out | Darker colors |
| Friendly smile | Uneven horns | Stronger expression |
Keep the spooky version appropriate for general Halloween décor rather than making it graphic.
Monster Mason Jar Lighting Ideas
Fairy Lights
Place battery-operated fairy lights inside the completely dry jar.
Several small lights can create a scattered glow.
Flameless LED Tealight
Use one battery-powered flameless tealight for a simpler lighting effect.
Colored LED Light
If you actually test it with your finished monster, you could try a green, purple, or orange battery-powered light.
Only describe a specific colored-glow effect if the real combination of paint and lighting produces it.
For a decorated jar, prioritize flameless battery-powered illumination.
Ways to Decorate With Monster Mason Jars
Halloween Mantel
Group colorful monster jars with pumpkins, bats, and other playful Halloween decorations.
Party Table
Make several monsters with completely different personalities and use them across a Halloween party table.
Entryway
Place one or more jars beside a Halloween sign or small pumpkin display.
Window Display
Use illuminated monster jars after dark.
Kids’ Halloween Table
Cute monster jars can work as decorations around a supervised craft or snack table.
Shelf Decor
Mix different jar sizes and colors instead of lining up several identical monsters.
Monster Mason Jar Centerpiece Ideas
Colorful Monster Trio
Create three different characters:
- Green monster
- Purple monster
- Orange monster
Change the eyes and hair too so each one has its own personality.
Googly-Eye Centerpiece
Use a different googly-eye arrangement on every jar.
One can have one huge eye, another three medium eyes, and another several small ones.
Cute Monster Centerpiece
Stick with friendly faces, bright colors, and smaller teeth.
Glowing Monster Centerpiece
Add flameless lighting to several jars for an illuminated display.
Halloween Character Centerpiece
Combine your monster with:
- Frankenstein
- Mummy
- Vampire
- Ghost
- Witch
The general monster adds more color and unpredictability to a group of recognizable Halloween characters.
Monster Mason Jar Craft Safety Notes
Because the base is breakable glass, this project needs appropriate supervision.
- Don’t use chipped or cracked jars.
- Younger children need adult supervision.
- Adults should handle broken glass.
- Follow your paint and adhesive directions.
- Let everything dry or cure fully.
- Use flameless battery-powered lighting.
- Keep paper, yarn, feathers, foam, ribbon, adhesive, and other decorative materials away from heat.
- Don’t assume the decorated jar remains food-safe.
The CraftedMom guidelines specifically recommend adult supervision with glass crafts and flameless battery-powered lighting instead of open flames when mason jars include paper, paint, glue, ribbon, foam, yarn, and similar materials.
Can Kids Make This Monster Mason Jar Craft?
The key idea is simple: your monster does not need to look like anyone else’s.
The open-ended design works especially well when you want children to make creative choices rather than copy one exact example.
Adults should supervise:
- Glass handling
- Jar inspection
- Difficult cutting
- Strong adhesive use
Kids can help with:
- Choosing the monster color
- Painting
- Choosing how many eyes it has
- Arranging googly eyes
- Adding teeth
- Choosing horns
- Adding yarn hair
- Creating spots and stripes
Because the base is breakable, don’t present this as an unsupervised toddler project.
Turn It Into a Design-a-Monster Activity
This is one of the strongest ways to use the open-ended nature of the craft.
Prepare several choices before anyone starts permanently attaching pieces.
Eye Choices
- One giant eye
- Pair of eyes
- Tiny googly eyes
- Multiple eyes
Mouth Choices
- Smile
- Zigzag
- Open mouth
- Crooked mouth
Teeth Choices
- Triangles
- Squares
- Fangs
Horn and Ear Choices
- Pointed
- Round
- Curved
- Mismatched
Hair Choices
- Yarn
- Pipe cleaners
- Paper
- Feathers
Then let each person build a completely different monster.
The goal isn’t to recreate one sample jar. It’s to use the same basic craft setup to create a whole collection of original characters.
Make a Whole Monster Mason Jar Family
If you’re already preparing several jars, give each monster a completely different personality.
For example:
Tall Purple Monster: Three eyes, curly green hair, and two fangs.
Medium Green Monster: One giant eye, orange horns, and crooked teeth.
Small Blue Monster: Two huge eyes, tiny teeth, and a purple bow tie.
You could also give each one a different pattern, such as spots, zigzags, or stripes.
Keeping the monsters intentionally different is one of the strongest visual ideas for this article.
Monster Mason Jar vs. Frankenstein Mason Jar
This distinction matters because a green monster can easily start looking like Frankenstein if you add the wrong identifying details.
| Frankenstein Mason Jar | Monster Mason Jar |
| Usually green | Any color |
| Black jagged hair | Any hairstyle |
| Thick eyebrows | Optional eyebrows |
| Stitches | Any patterns/details |
| Gray side bolts | Horns, ears, or other features |
| Recognizable fixed character | Open-ended original character |
| Specific face structure | Any number of eyes and teeth |
A Frankenstein jar should consistently use recognizable features such as green skin, jagged black hair, stitches, eyebrows, and bolts.
The Monster Mason Jar Craft should instead stay deliberately flexible. Use any colors, eye count, horns, ears, teeth, crazy hair, spots, or other imaginative details.
Don’t let it become simply another green Frankenstein.
More Halloween Mason Jar Crafts
Once your monster is finished, continue the collection with:
- Halloween Mason Jar Crafts
- Pumpkin Mason Jar Craft
- Ghost Mason Jar Craft
- Witch Mason Jar Craft
- Frankenstein Mason Jar Craft
- Mummy Mason Jar Craft
- Vampire Mason Jar Craft
- Jack-O’-Lantern Mason Jar Craft
- Black Cat Mason Jar Craft
- Spider Mason Jar Craft
- Skeleton Mason Jar Craft
- Monster Crafts
The intended internal-link structure uses Halloween Mason Jar Crafts as the parent pillar and Monster Crafts as the related character-based pillar.
Final Thoughts
This monster mason jar craft gives you more creative freedom than the character-specific jars because you get to decide nearly everything about the finished design.
Start with a bright color, build the face around as many eyes and teeth as you want, then add horns, ears, patterns, crazy hair, or flameless lights. Make one monster for a shelf or create a whole mixed-color family for a Halloween centerpiece.
Frequently Asked Questions
What kind of paint should I use on a mason jar?
Use craft paint suitable for glass and follow the manufacturer’s preparation, drying, and curing instructions. Use the exact type that works with the project you actually make.
What color should I paint a monster mason jar?
Any color can work. Green, purple, blue, orange, pink, and yellow are all strong options, and you can mix colors if you want a more playful design.
How many eyes should my monster have?
As many as you want. Try one giant eye, two normal eyes, three eyes, or a whole group of different-sized googly eyes.
Can I use googly eyes?
Yes. Googly eyes work especially well for this project because mixing different sizes and quantities makes every monster look different.
