

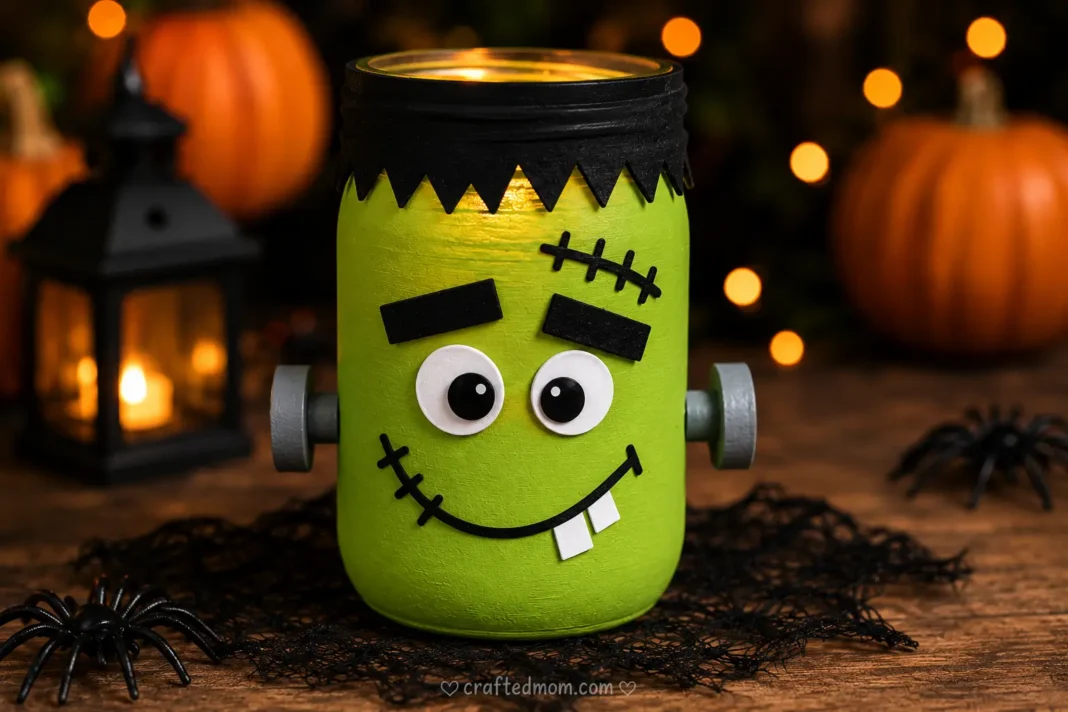
This Frankenstein mason jar craft turns a simple glass jar into a playful Halloween monster with a green face, jagged black hair, bold eyebrows, stitches, and those unmistakable side bolts. Add a crooked smile, one little tooth, or even flameless fairy lights to give your Frankenstein his own personality.
What makes this version especially useful is that it doubles as Halloween décor. The tall shape of a mason jar naturally suits Frankenstein’s blocky face, so the finished jar works nicely on a mantel, shelf, entryway table, party display, or Halloween centerpiece. The planned design centers on a green jar, black jagged hair, large eyes, thick eyebrows, stitches, a crooked mouth, gray or silver bolts, and optional lighting.
Why You’ll Love This Frankenstein Mason Jar Craft
Frankenstein is one of those Halloween characters you can recognize with only a handful of details. A green face, black hair, stitches, and side bolts are enough to make the character obvious, which means you can keep this project fairly simple or add lots of personality.
It also works well if you’re making several Halloween mason jars at once. Change the eyes, eyebrows, mouth, hairline, or accessories and every monster can look different.
A few reasons this project works so well:
- It uses an ordinary mason jar as the base.
- The character is instantly recognizable.
- You can make cute, silly, grumpy, or slightly spooky faces.
- It works as actual Halloween home décor.
- Several jars can form a coordinated monster display.
- Flameless lighting can turn it into a glowing decoration.
- It pairs naturally with mummies, ghosts, vampires, witches, and pumpkins.
Supplies You’ll Need
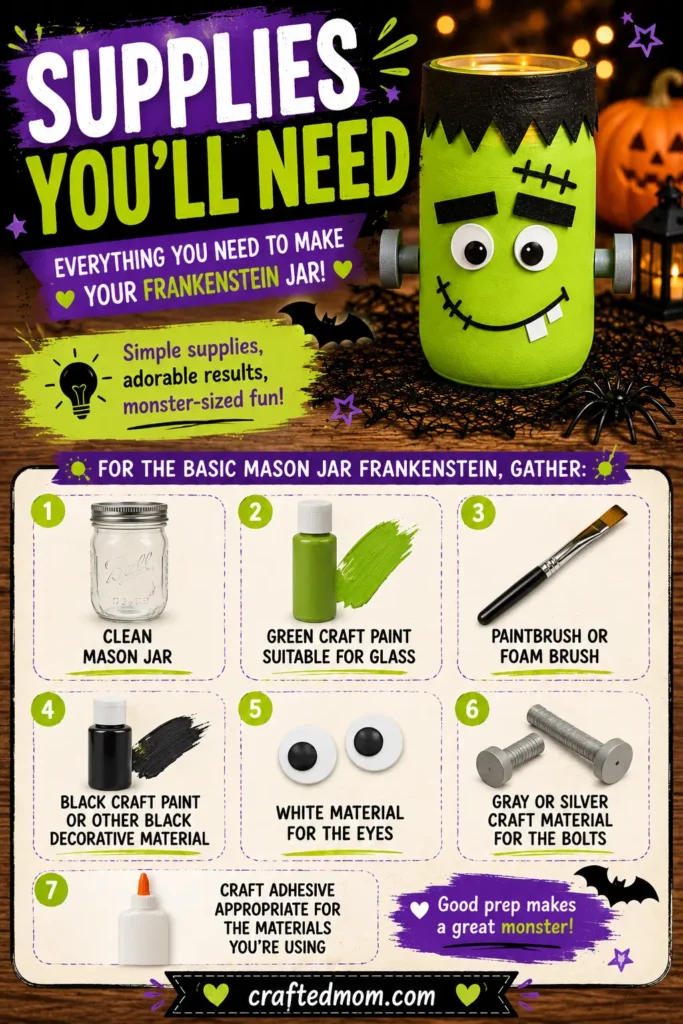
For the basic mason jar Frankenstein, gather:
- Clean mason jar
- Green craft paint suitable for glass
- Paintbrush or foam brush
- Black craft paint or another suitable black decorative material
- White material for the eyes
- Gray or silver craft material for the bolts
- Craft adhesive appropriate for the materials you’re using
Optional supplies include:
- Googly eyes
- Black adhesive vinyl
- Black craft foam
- Gray craft foam
- Silver paper
- Black yarn
- Purple ribbon
- Orange ribbon
- Jute twine
- Pom-poms
- Halloween stickers
- Battery-operated fairy lights
- Flameless LED tealight
- Small bow tie decoration
Use paint intended for glass and an adhesive suitable for the exact decorative materials you choose. Because no specific tested paint or glue was provided for this version, follow the manufacturer’s instructions for preparation, drying, and curing rather than assuming one universal method.
Before You Start: Prepare the Mason Jar
Start with an empty jar that is clean and completely dry.
Remove the original label and clean away any adhesive residue. Also wipe off grease and fingerprints before painting.
Check the glass carefully for chips or cracks. A damaged jar shouldn’t be used for this project.
Taking a little extra time here gives you a cleaner surface for both the paint and the decorations.
How to Make a Frankenstein Mason Jar Craft
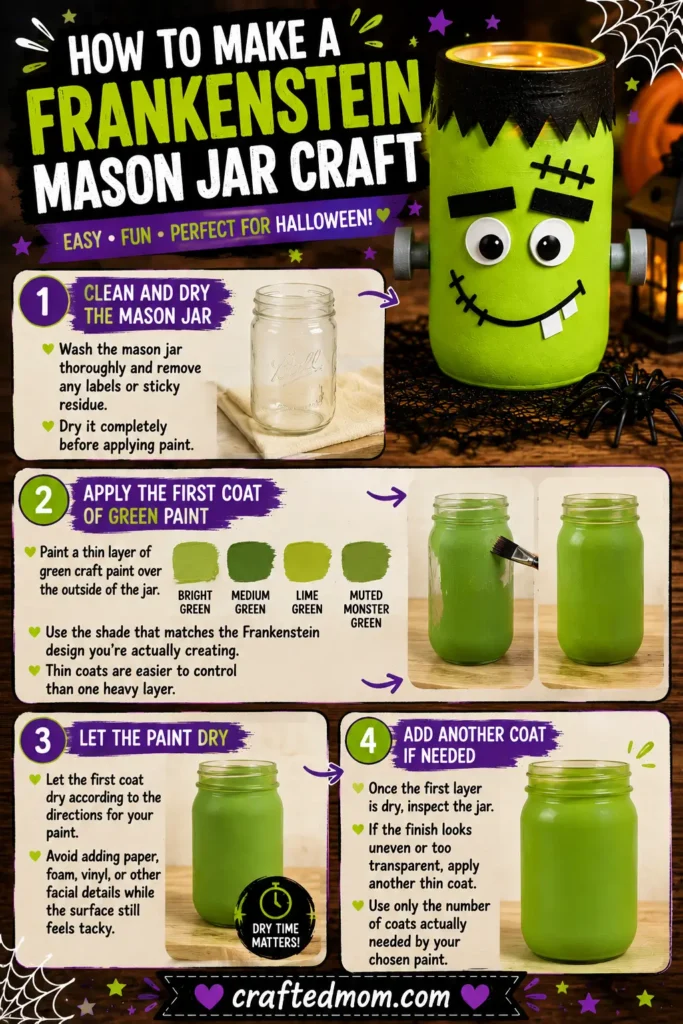
Step 1: Clean and Dry the Mason Jar
Wash the mason jar thoroughly and remove any labels or sticky residue.
Dry it completely before applying paint.
Step 2: Apply the First Coat of Green Paint
Paint a thin layer of green craft paint over the outside of the jar.
Depending on the look you want, you could use:
- Bright green
- Medium green
- Lime green
- Muted monster green
Use the shade that matches the Frankenstein design you’re actually creating.
Thin coats are easier to control than one heavy layer.
Step 3: Let the Paint Dry
Let the first coat dry according to the directions for your paint.
Avoid adding paper, foam, vinyl, or other facial details while the surface still feels tacky.
Step 4: Add Another Coat if Needed
Once the first layer is dry, inspect the jar.
If the finish looks uneven or too transparent, apply another thin coat. Use only the number of coats actually needed by your chosen paint rather than assuming every jar requires two or three coats.
Design the Frankenstein Face
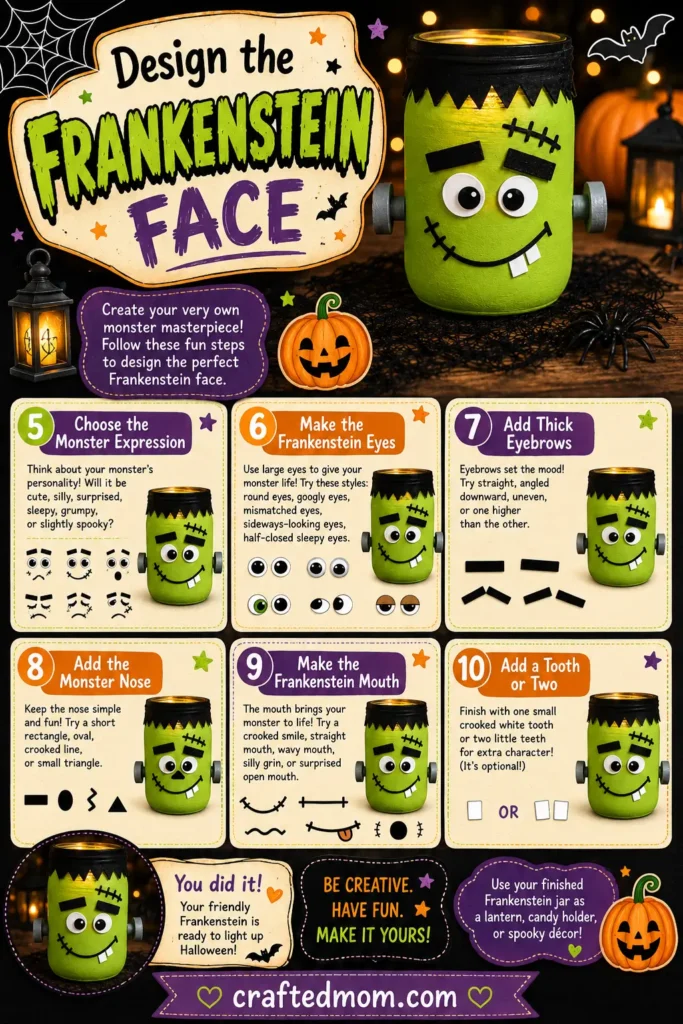
The face is where this project gets fun because small changes to the eyes and eyebrows can give the monster a completely different personality.
Step 5: Choose the Monster Expression
Before attaching anything permanently, decide what kind of Frankenstein you want.
Try:
- Cute
- Silly
- Surprised
- Sleepy
- Grumpy
- Slightly spooky
Lay out the main face pieces first so you can adjust the spacing.
Step 6: Make the Frankenstein Eyes
Create two large eyes.
Possible styles include:
- Round white eyes with black pupils
- Googly eyes
- Mismatched eyes
- Sideways-looking eyes
- Half-closed sleepy eyes
The eyes don’t have to be perfectly symmetrical. Slightly uneven placement can make the character feel more playful.
Step 7: Add Thick Eyebrows
Make bold black eyebrows using your chosen paint or decorative material.
Try positioning them:
- Straight
- Angled downward
- Uneven
- With one slightly higher than the other
Eyebrow placement can completely change the expression.
Angled brows make Frankenstein look grumpy, while raised brows work better for a surprised face.
Step 8: Add the Monster Nose
Keep the nose simple so it doesn’t compete with the more recognizable Frankenstein details.
Possible shapes include:
- Short rectangle
- Oval
- Crooked line
- Small triangle
Place it between the eyes and mouth.
Step 9: Make the Frankenstein Mouth
Use black paint or another suitable material to make the mouth.
Try a:
- Crooked smile
- Straight mouth
- Wavy mouth
- Silly grin
- Surprised open mouth
You don’t need a complicated expression. A slightly uneven mouth actually suits this character nicely.
Step 10: Add a Tooth or Two
For a cuter Frankenstein, add one small crooked white tooth.
Two little teeth can work too.
This step is optional.
Add Frankenstein’s Hair and Stitches
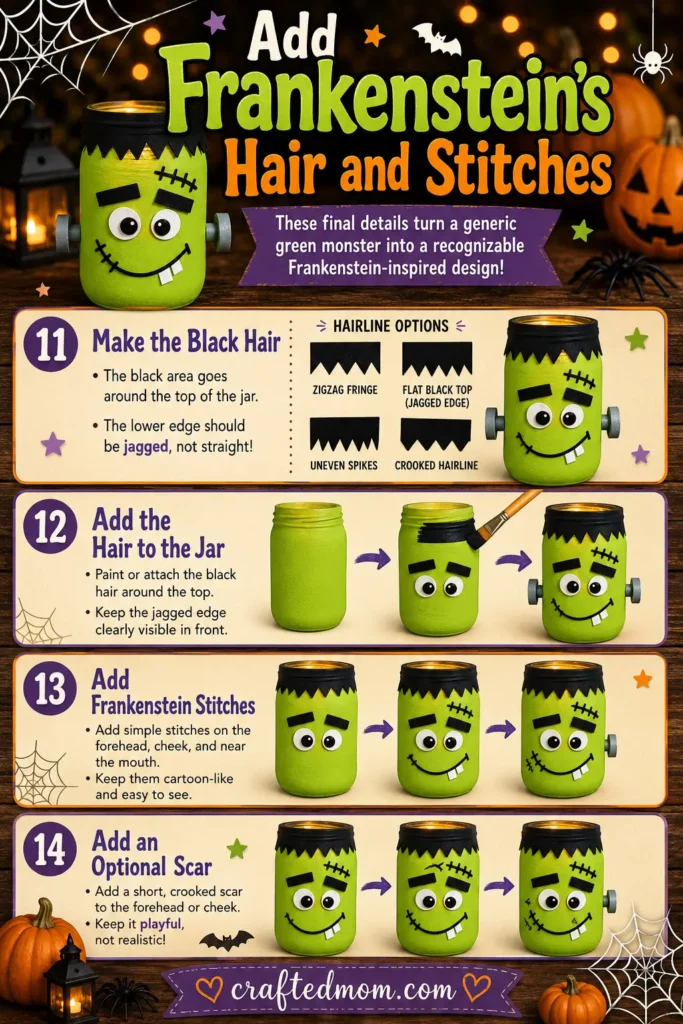
These details are what move the jar from a generic green monster toward a recognizable Frankenstein-inspired design.
Step 11: Make the Black Hair
Create a black area around the top of the jar.
The lower edge should be jagged rather than perfectly straight.
Possible hairlines include:
- Zigzag fringe
- Flat black top with a jagged edge
- Uneven spikes
- Crooked hairline
Step 12: Add the Hair to the Jar
Paint or attach your black hair section near the top.
Make sure enough green remains visible underneath and that the jagged lower edge can be clearly seen from the front.
Step 13: Add Frankenstein Stitches
Draw or paint a short dark line, then add several little marks crossing it.
Good places for the stitches include:
- Forehead
- Cheek
- Near the mouth
Keep them simple and cartoon-like.
A couple of clear stitches usually work better than covering the entire face with them.
Step 14: Add an Optional Scar
You can also add one short crooked line to the forehead or cheek.
Keep it subtle so the design stays playful rather than realistic.
Make the Frankenstein Bolts
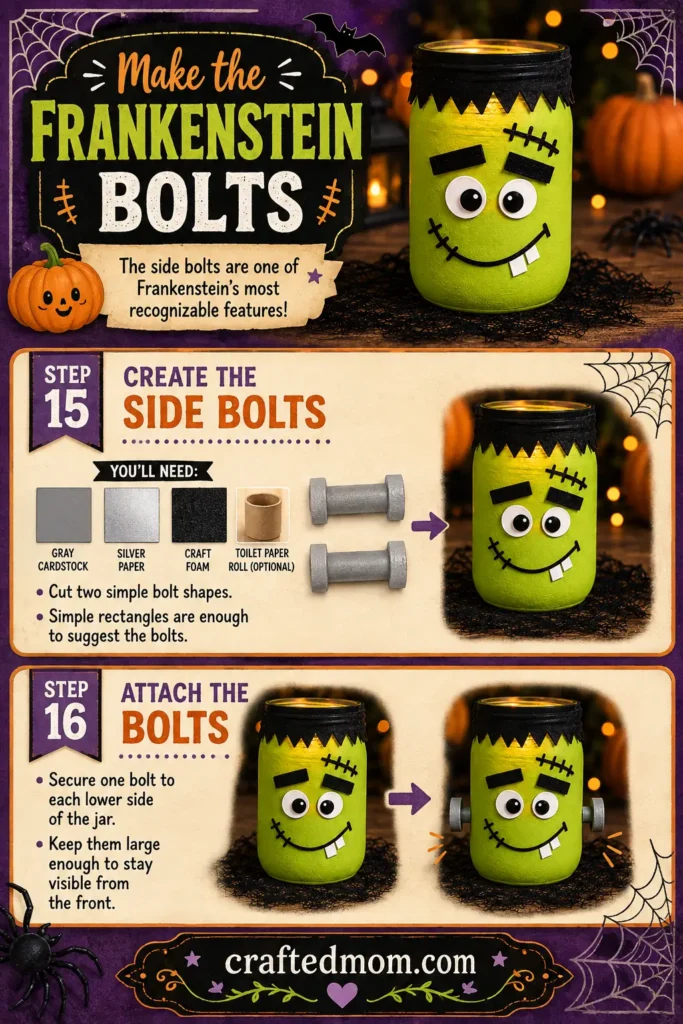
Step 15: Create the Side Bolts
Cut two simple bolt shapes from:
- Gray cardstock
- Silver paper
- Craft foam
- Another suitable material
Simple rectangles are enough to suggest the bolts.
Step 16: Attach the Bolts
Secure one bolt to each lower side of the jar.
Position them so they’re still visible when you’re looking at Frankenstein from the front.
These side bolts are one of the most recognizable details in the entire project, so don’t make them so small that they disappear into the design.
Add Optional Accessories
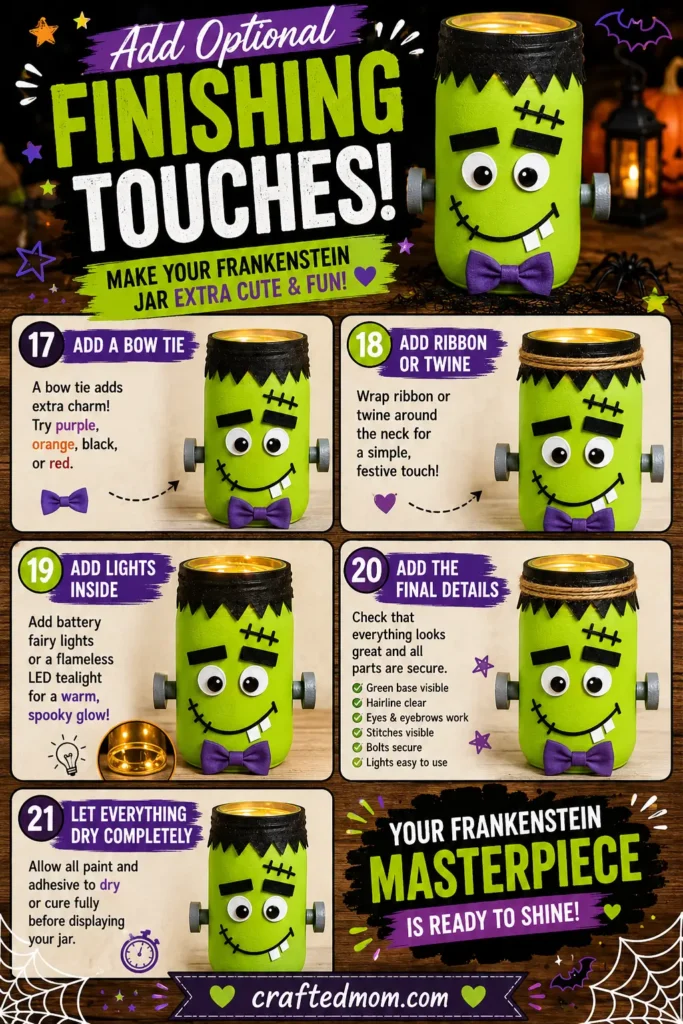
Once the main monster is complete, you can stop there or add one or two extra details.
Step 17: Add a Bow Tie
A little bow tie works especially well for a cute Frankenstein.
Good Halloween colors include:
- Purple
- Orange
- Black
- Red
Attach it toward the lower front of the jar or incorporate it around the neck area.
Step 18: Add Ribbon or Twine
If you want to dress up the jar opening, wrap ribbon or twine around the neck.
Keep it simple so it doesn’t compete with Frankenstein’s face.
Step 19: Add Lights Inside
Once everything is dry, add:
- Battery-operated fairy lights, or
- A flameless LED tealight
Keep the battery pack or switch easy to reach.
Step 20: Add the Final Details
Take one final look at your monster.
Check that:
- The green base remains visible.
- The black hairline is easy to recognize.
- The eyes and eyebrows work together.
- The stitches are visible.
- Both side bolts are secure.
- Any lighting can still be turned on and off easily.
Step 21: Let Everything Dry Completely
Allow all paint and adhesive to dry or cure fully before displaying the jar.
The exact time depends on the products you’re using, so follow their instructions.
Easy Frankenstein Mason Jar Craft Tips
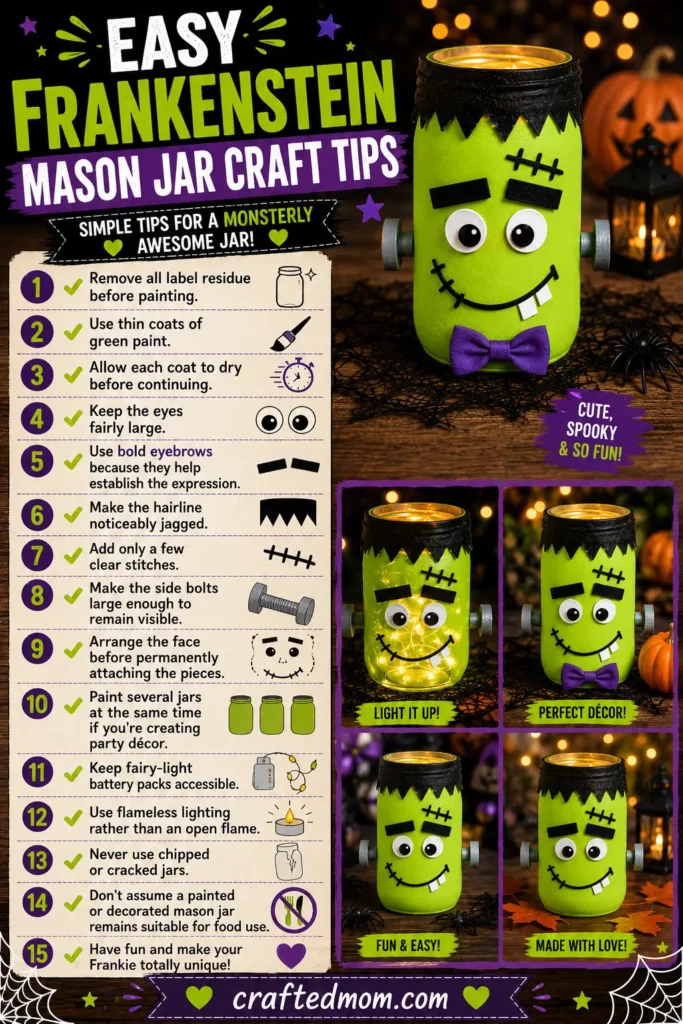
A few details can make your finished jar cleaner and easier to recognize:
- Remove all label residue before painting.
- Use thin coats of green paint.
- Allow each coat to dry before continuing.
- Keep the eyes fairly large.
- Use bold eyebrows because they help establish the expression.
- Make the hairline noticeably jagged.
- Add only a few clear stitches.
- Make the side bolts large enough to remain visible.
- Arrange the face before permanently attaching the pieces.
- Paint several jars at the same time if you’re creating party décor.
- Keep fairy-light battery packs accessible.
- Use flameless lighting rather than an open flame.
- Never use chipped or cracked jars.
- Don’t assume a painted or decorated mason jar remains suitable for food use.
Frankenstein Mason Jar Face Ideas
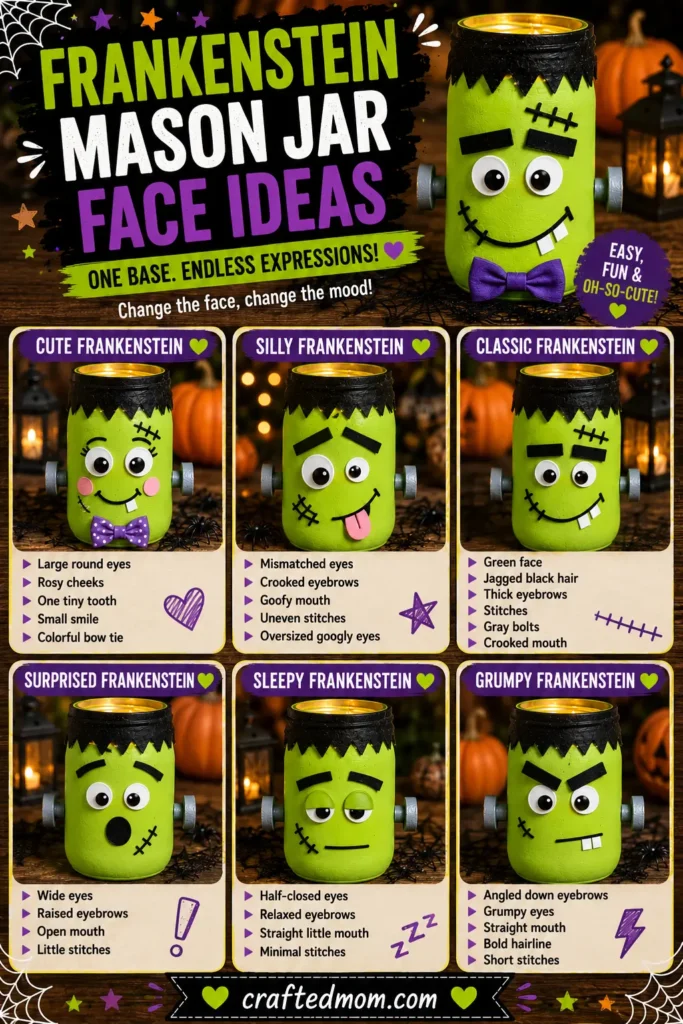
You can make several jars from the same basic design simply by changing the face.
Cute Frankenstein
Use:
- Large round eyes
- Rosy cheeks
- One tiny tooth
- Small smile
A colorful bow tie can finish the look.
Silly Frankenstein
Try:
- Mismatched eyes
- Crooked eyebrows
- Goofy mouth
- Uneven stitches
This version works especially well with oversized googly eyes.
Classic Frankenstein
Stick with the most recognizable features:
- Green face
- Jagged black hair
- Thick eyebrows
- Stitches
- Gray bolts
A crooked mouth finishes the traditional Halloween look.
Surprised Frankenstein
Use wide eyes, raised eyebrows, and an open mouth.
Sleepy Frankenstein
Try half-closed eyes, relaxed eyebrows, and a straight little mouth.
Grumpy Frankenstein
Angle the eyebrows downward and use a straighter mouth with a bold hairline.
Keep even the grumpy version cartoon-like rather than genuinely frightening.
Frankenstein Mason Jar Variations to Try
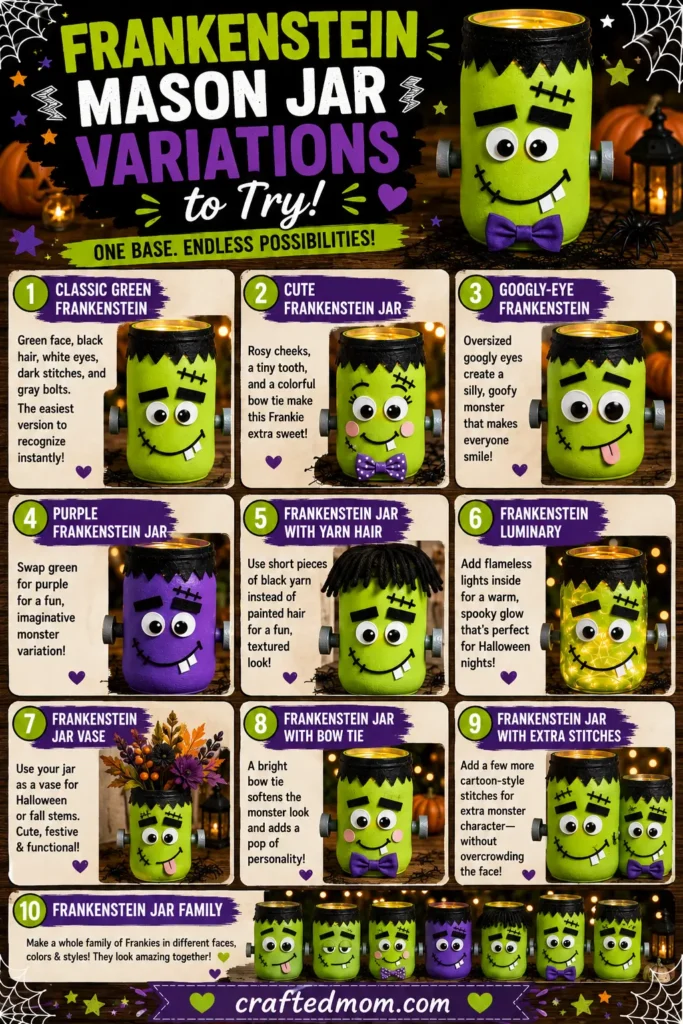
Classic Green Frankenstein Mason Jar
Use a green face, black hair, white eyes, dark stitches, and gray or silver bolts.
This is the easiest version to recognize immediately.
Cute Frankenstein Jar
Add rosy cheeks, a tiny tooth, and a colorful bow tie.
Googly-Eye Frankenstein
Replace the regular eyes with oversized googly eyes for a sillier character.
Purple Frankenstein Jar
Swap the traditional green base for purple if you’d rather make an imaginative monster variation.
Just keep the black hair, bolts, and stitched details so the Frankenstein inspiration still comes through.
Frankenstein Jar With Yarn Hair
Use short pieces of black yarn around the top instead of painting the entire hair section.
Frankenstein Mason Jar Luminary
Place flameless lighting inside once the jar is fully dry.
Frankenstein Mason Jar Vase
Use the finished jar for suitable decorative purposes, such as holding artificial Halloween or fall stems.
Frankenstein Jar With Bow Tie
Add a bright purple or orange bow tie to soften the classic monster look.
Frankenstein Jar With Extra Stitches
Add a few more cartoon-style stitched details around the face.
Don’t overcrowd the jar. You still want the large eyes, eyebrows, and hairline to stand out.
Frankenstein Mason Jar Family
Make several jars with different:
- Heights
- Expressions
- Hairlines
- Bow ties
- Stitches
A group works especially well because Frankenstein’s expression is so easy to change.
Cute Frankenstein vs. Classic Halloween Frankenstein
Both versions start with the same green mason jar, but a few face choices change the overall mood.
| Cute Frankenstein | Classic Halloween Frankenstein |
| Big round eyes | Bold white eyes |
| Rosy cheeks | Thick black eyebrows |
| Tiny smile | Crooked mouth |
| One little tooth | Visible stitches |
| Bright bow tie | Gray side bolts |
| Softer expression | Jagged black hair |
If you’re decorating for younger children or prefer cheerful Halloween characters, the cute version is an easy choice.
For a traditional monster display, keep the black hairline, thick eyebrows, stitches, side bolts, and crooked mouth more prominent.
Frankenstein Mason Jar Lighting Ideas
Fairy Lights
Loosely fill the jar with battery-powered fairy lights once all paint and adhesives have fully dried.
The scattered points of light can give your monster a fun glowing effect.
Flameless LED Tealight
For something simpler, place a battery-powered flameless tealight inside.
This works especially well when you want several jars arranged together.
Green LED Light
If you actually test a green battery-powered light with the finished jar, it could intensify the monster color.
Don’t claim a specific glowing effect until you’ve seen what your actual paint opacity and lighting combination produces. The supplied plan specifically prioritizes flameless illumination.
Ways to Decorate With Frankenstein Mason Jars
Halloween Mantel
Place the Frankenstein jar beside pumpkins, bats, black accents, or other classic monster decorations.
Entryway Display
One jar can sit beside a Halloween sign or small seasonal arrangement near the door.
Party Table
Make several Frankenstein jars with different expressions and spread them across a Halloween party table.
Window Display
Flameless illuminated jars can work nicely in a window after dark.
Shelf Decor
A smaller Frankenstein jar makes an easy Halloween accent without taking over the whole shelf.
Monster Centerpiece
Combine Frankenstein with other Halloween character jars such as ghosts, mummies, vampires, and witches.
Frankenstein Mason Jar Centerpiece Ideas
Monster Trio
Use three Frankenstein jars in different sizes and give each one a different expression.
Frankenstein and Pumpkin Centerpiece
Green and orange naturally create a strong Halloween color combination.
Pair the Frankenstein jars with bright pumpkin jars for a simple character centerpiece.
Purple and Green Centerpiece
Use purple ribbon, pumpkins, flowers, or other accents alongside the green jars.
Glowing Monster Centerpiece
Put flameless lights inside several jars for an illuminated table display.
Mixed Monster Centerpiece
Combine:
- Frankenstein
- Ghost
- Mummy
- Vampire
- Witch
This is a natural way to connect several different projects from the Halloween Mason Jar Crafts collection.
Frankenstein Mason Jar Craft Safety Notes
This craft uses breakable glass, so it needs a little more supervision than flat paper or craft-stick projects.
- Don’t use a mason jar that is cracked or chipped.
- Younger children need close adult supervision.
- Adults should handle broken glass.
- Follow all paint and adhesive directions.
- Allow finishes to dry or cure fully.
- Use flameless battery-operated lights.
- Keep paper, yarn, ribbon, and similar decorations away from heat.
- Don’t assume the finished decorated jar remains food-safe.
The CraftedMom guidelines specifically call for adult supervision with glass crafts and recommend flameless battery-powered lights when mason jars include paint, glue, paper, yarn, ribbon, foam, or similar decorative materials.
Can Kids Make This Frankenstein Mason Jar Craft?
Yes, children can help make a Frankenstein jar, but an adult should supervise closely because the base is glass.
Adults should handle or supervise:
- Inspecting the mason jar
- Preparing the glass
- More difficult cutting
- Stronger adhesive work
- Attaching the side bolts
Kids can help with plenty of the creative parts, including:
- Painting the green base
- Choosing the monster’s expression
- Positioning the eyes
- Choosing eyebrow angles
- Drawing simple stitches
- Adding a bow tie
- Choosing other decorations
Because mason jars are breakable, I wouldn’t treat this as an independent toddler craft.
For younger children, the adult can prepare the structural pieces while letting the child make meaningful choices about the face and decorations.
Make a Whole Frankenstein Mason Jar Family
Making several different monster faces is one of the easiest ways to turn this craft into a larger Halloween display.
Try something like:
Tall Frankenstein: Thick eyebrows, straight mouth, three stitched details.
Medium Frankenstein: Googly eyes, crooked smile, purple bow tie.
Small Frankenstein: Big eyes, one tiny tooth, rosy cheeks.
Changing the expression makes the group feel intentional rather than like three copies of the same jar.
More Halloween Mason Jar Crafts
Once Frankenstein is finished, build out the display with other character jars:
- Halloween Mason Jar Crafts
- Pumpkin Mason Jar Craft
- Ghost Mason Jar Craft
- Witch Mason Jar Craft
- Jack-O’-Lantern Mason Jar Craft
- Mummy Mason Jar Craft
- Vampire Mason Jar Craft
- Monster Mason Jar Craft
- Black Cat Mason Jar Craft
- Spider Mason Jar Craft
- Skeleton Mason Jar Craft
- Frankenstein Crafts
The main parent, sibling, and cross-topic linking opportunities are defined in the project outline.
Final Thoughts
This Frankenstein mason jar craft turns a simple green-painted jar into a recognizable Halloween decoration with only a few defining details: jagged black hair, bold eyebrows, stitches, and side bolts.
Keep one monster on a shelf, make a trio for a centerpiece, or pair Frankenstein with a Mummy Mason Jar Craft, Vampire Mason Jar Craft, or the broader Halloween Mason Jar Crafts collection for a full character display.
Frequently Asked Questions
What kind of paint should I use on a mason jar?
Use craft paint designed for glass and follow the manufacturer’s preparation, drying, and curing directions. When you make the final version, use the exact paint that works with your tested project.
Do I need to prime the jar first?
That depends on the specific paint you’re using. Follow its directions rather than assuming every glass paint requires primer.
How many coats of green paint do I need?
Use however many thin coats your actual paint requires for the finish you want. Paint opacity varies by product, color, and application.
How do I make Frankenstein’s hair on a mason jar?
Create a black section around the top of the jar with a jagged or zigzag lower edge. You can paint it or use another appropriate black decorative material.
